평일 스무디를 구매하면 주말 스무디를 무료로 드립니다. (5개 가격에 7개!)
웰니스위크
새로운 코르셋을 묶는 방법은 여러 가지가 있습니다. 우리는 그 중 일부를 제공하고 각자의 장단점을 설명할 것입니다. 우리의 가이드는 완전 초보자도 도와줄 것이며, 당신이 코르셋 리본을 어떻게 묶고 싶은지 결정하는 데는 그리 오랜 시간이 걸리지 않을 것입니다. 혼자서 코르셋을 조이는 데 더 편안한 방법이나 누군가의 도움을 받을 수 있는 방법이 있습니다.
각 코르셋에는 특별한 하드 코르셋 테이프가 포함되어 있습니다. 하지만 코르셋과 같은 색상의 새틴 테이프를 원하신다면 다른 테이프를 구매하실 수 있습니다. 모든 패브릭 상점에서 판매되는 얇은 새틴 테이프는 코르셋을 한두 번만 조이는 데 사용할 수 있으며, 가끔 또는 결혼식에 착용할 경우에 적합합니다. 우리의 레이싱 코르셋 테이프는 훨씬 단단하며 실제로 조이기 위해 특별히 설계되었습니다. authentic corset. 코르셋을 묶기 위해서는 긴 리본 한 조각만 필요하니, 두 조각으로 자르지 마세요.

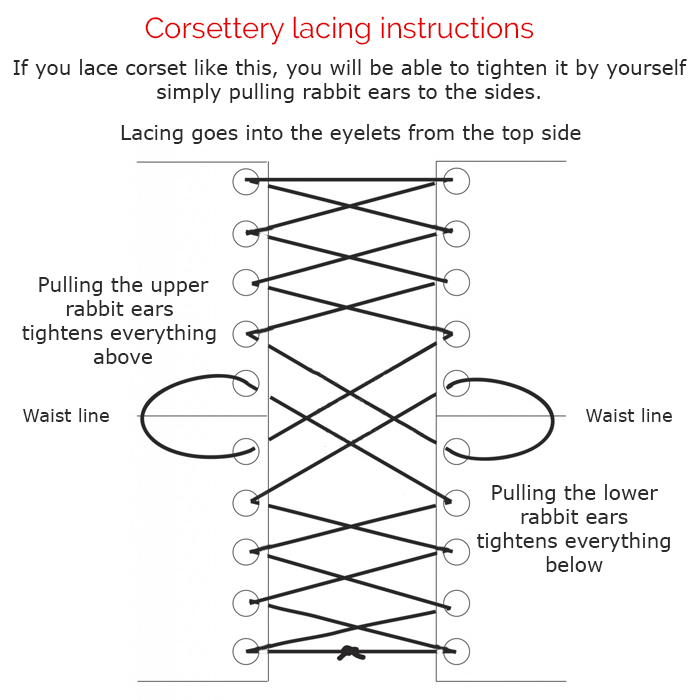
이렇게 신발끈을 묶으면 이렇게 보일 것입니다. real corset.


결과는 다음과 같이 보일 것입니다

또한 우리의 웨딩 코르셋 가이드.
혼자서 코르셋을 묶고 매는 방법을 배우고 싶다면, 당신은 올바른 곳에 왔습니다! 코르셋은 어떤 의상에도 멋을 더할 수 있는 훌륭한 방법이며, 스스로 매고 묶는 방법을 배우는 것은 돈을 절약하고 코르셋이 완벽하게 맞도록 하는 좋은 방법입니다.
코르셋을 묶기 전에, 당신에게 맞는 사이즈를 선택해야 합니다. 코르셋은 몸에 꼭 맞아야 하지만, 불편하거나 통증을 유발할 정도로 너무 조이지 않아야 합니다. 적절한 사이즈를 찾았다면, 이제 묶기 시작할 시간입니다!
코르셋을 끈으로 묶으려면, 먼저 코르셋 뒷면의 구멍(작은 구멍 또는 아이렛)을 통해 끈을 통과시킵니다. 양쪽에서 끈을 같은 방향으로 통과시키는지 확인하세요. 구멍을 통해 끈이 통과되면, 끈을 위쪽에서 묶어 매듭을 지으세요.
매듭을 묶은 후에는 끈을 단단히 당기기 시작하세요. 이 과정은 점진적으로 진행해야 하며, 양쪽에서 끈을 고르게 당기는 것이 중요합니다. 끈을 당기면 코르셋의 형태가 잡히기 시작할 것입니다. 끈을 최대한 단단히 당긴 후, 아래쪽에서 리본 모양으로 묶어주세요.
이제 코르셋이 묶였으니, 묶을 시간입니다. 먼저 끈을 허리 주위에 감싸고, 양쪽의 끈이 고르게 유지되도록 합니다. 허리 주위에 끈을 감싼 후, 위쪽에서 리본 모양으로 묶습니다.
마지막으로, 완벽한 핏을 얻기 위해 끈을 조정해야 합니다. 먼저, 상단의 끈을 느슨하게 한 다음, 점차적으로 조여서 코르셋이 몸에 꼭 맞도록 합니다. 완벽한 핏이 되었으면, 아래쪽에서 끈을 리본 모양으로 묶으세요.
이제 당신은 스스로 코르셋을 끈으로 묶고 묶는 방법을 알게 되었습니다! 약간의 연습을 통해 어떤 의상에도 완벽한 코르셋을 만들 수 있을 것입니다.
First time waspie and it’s great. Just wish it did t have the muffin top issue.
Authentic Santa corset dress with fluffy skirt, red Christmas velvet dress. Mini Santa Dress
Woww I absolutely love the quality and craftsmanship of this corset ! It’s exceptionally made, I’m a new loyal customer!
very nice and payable corsets
I was nervous on timing because I didn’t hear back but it got delivered two days before the event I posted about. Sooo cute and made my birthday perfect! Thank you!
Brown lambskin suede exclusive overbust corset from Corsettery Western Collection
I absolutely love this, thank you! This is my first corset. Fits a little tight, but training it is. I will be buying more. Also, it is worth the wait, yall!!!
...thanks a lot again...
I was delighted with my new corsets. It turned out even better than I expected. I couldn’t be happier with my purchase.
I got this for a goth event coming up. It fits great and the shipping time was also great! Will definitely order from here again.
Satin corset with long frill with leather bows. Draculaura cosplay corset. Pinup, photoshot, sexy, prom, Valentine, wedding dress
I so in love with the corset! It fits perfectly though I did think I asked for two inches added to the back panel but maybe it was added I just can’t tell. But I’ve been showing it off.
The color is gorgeous, soft lambskin feels great, size fits decently for my frist measured corset! Very excited to where out.
I adore the two I purchased.
I think this corset it great! And very sexy. It amplifies my hips and gives me more of an hour-glass shape. And the quality is excellent!


As someone who wears corsets both for fashion styling and waist support, I absolutely loved this post. I wear overbust corsets when dressing up for events, but I also wear a cotton underbust corset daily under my outfits for posture and waist training. I had no idea that using the wrong lacing method could actually reduce the effectiveness of a corset or damage it over time.
This post helped me switch to a proper lacing method that not only looks neater but also preserves the shape of my corset longer. Especially for tight-lacing, even tension and secure loops are everything. It’s amazing how much better my corsets fit now, just because I learned the right way to lace them. Corsettery’s commitment to education makes them stand out so much in the corset community.
I wish I had seen this when I first started with corsets! I completely messed up my first satin corset by lacing it too tight at the top and not tightening from the waistline. I thought the discomfort was normal — turns out, I just didn’t know how to lace a corset properly. This article explains everything in such a beginner-friendly way.
I tried the bunny ear method you recommended, and the difference is incredible. Now I can wear my underbust corset from Corsettery for hours without feeling like I’m being squished in all the wrong places. The visuals and breakdowns of each technique really helped me understand what’s best for different corset styles.
Thank you for making waist training less intimidating!
Corsettery never disappoints when it comes to educating their audience. This article helped me finally understand the subtle differences between straight lacing, spiral lacing, and inverted bunny ears. I always thought lacing was just aesthetic, but now I realize how critical it is to get the right lacing technique for comfort, safety, and proper waist training.
I own several Corsettery corsets — leather, velvet, and mesh — and each one responds slightly differently to lacing. This guide gave me the confidence to adjust each one appropriately depending on the material and how tight I want to lace for the day. Honestly, it’s this kind of support and information that keeps me loyal to Corsettery. It’s more than just buying a corset — it’s learning how to wear it the right way.
This is by far one of the best guides I’ve read about how to properly lace a corset! I’ve owned corsets before, but no one ever explained the importance of lacing technique the way this post does. I recently purchased a real steel-boned underbust corset from Corsettery for waist training, and this guide completely changed the way I wear it. After switching to the bunny ears lacing method, I noticed how much more evenly the pressure distributes — no more sore ribs or uneven compression.
I also appreciate the advice on loosening the corset properly before taking it off. That’s such an overlooked tip but crucial for protecting the integrity of the fabric and boning. This blog post isn’t just educational — it’s a must-read for anyone serious about tight-lacing or wearing corsets long-term.
I’ve been tight-lacing for several years, and one thing I always tell people is this: the lacing technique matters as much as the corset itself. This guide covers that so well. Whether you’re into gothic, burlesque, or daily waist training, proper lacing will protect your corset and your body. Corsettery is one of the few brands that makes real double-steel boned corsets that can handle actual training, and this guide proves they really know what they’re doing.