Buy your weekday smoothies and get your weekend ones for free. (7 for the price of 5!)
WELLNESSWEEK
Es gibt viele Möglichkeiten, wie Sie Ihr neues Korsett schnüren können. German Wir werden Ihnen einige davon anbieten und Vor- und Nachteile jedes einzelnen erklären. Unser Leitfaden wird auch kompletten Anfängern helfen, und es wird nur einige Zeit dauern, bis Sie entscheiden, wie Sie Ihr Korsettband schnüren möchten. Es gibt eine Methode, die bequemer ist, um das Korsett selbst zu straffen, oder Methoden, die geeignet sind, wenn Sie um Hilfe bitten können.
Kaufen Sie hier die Korsett-Schnürsenkel.
German ```Es wird ein spezielles hartes Korsettband mit jedem unserer Korsetts mitgeliefert. Aber Sie können ein anderes Band kaufen, wenn Sie ein Satinband in derselben Farbe wie Ihr Korsett haben möchten. Denken Sie daran, dass dünne Satinbänder, die in jedem Stoffgeschäft verkauft werden, nur einmal oder zweimal zum Festziehen Ihres Korsetts verwendet werden können und geeignet sind, wenn Sie es gelegentlich oder bei einer Hochzeit tragen. Unser Schnürkorsettband ist viel fester und wurde speziell entwickelt, um das Korsett wirklich festzuziehen.authentisches KorsettBitte denken Sie daran, dass Sie nur ein langes Stück Band zum Schnüren des Korsetts benötigen, schneiden Sie es nicht in zwei Stücke.
Kaufe Schnürsenkel für dein authentisches Korsett.

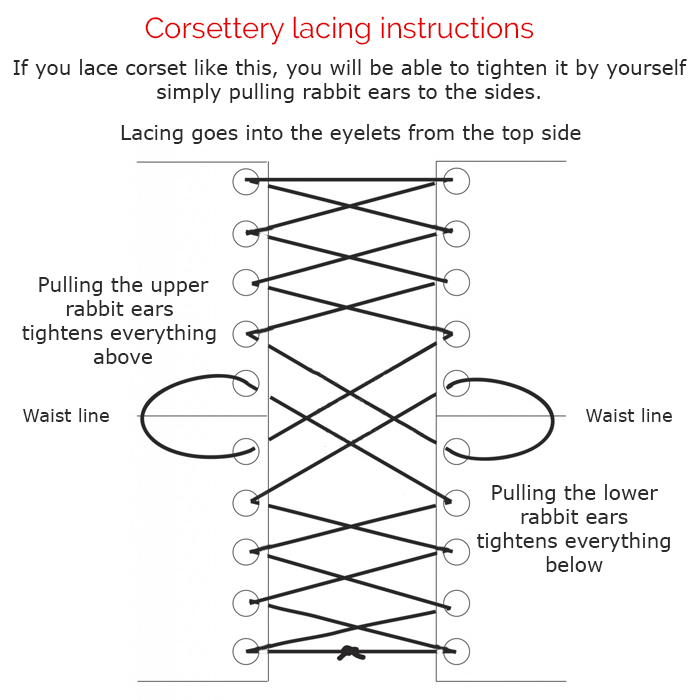
Auf diese Weise wird das Schnürsenkelmuster aufechtes KorsettGerman .


Das Ergebnis wird so aussehen

Anzeigenvollständige Sammlung von authentischen Korsetts
Schauen Sie sich auch unsereHochzeitskorsagenAnleitung.
Wenn Sie lernen möchten, wie Sie ein Korsett alleine schnüren und binden können, sind Sie hier genau richtig! Korsetts sind eine großartige Möglichkeit, jedem Outfit eine besondere Note zu verleihen, und das Erlernen des Schnürens und Bindens selbst ist eine großartige Möglichkeit, Geld zu sparen und sicherzustellen, dass Ihr Korsett perfekt passt.
Before you start lacing your corset, you’ll need to pick the right size for you. Your corset should fit snugly against your body, but it should not be so tight that it is uncomfortable or causes any pain. Once you’ve got the right size, it’s time to start lacing!
To lace your corset, start by threading the laces through the grommets (small holes or eyelets) on the back of the corset. Make sure that you thread the laces in the same direction on both sides. Once you have the laces threaded through the grommets, begin to tie them together in a knot at the top.
Sobald du den Knoten gebunden hast, fange an, die Schnürsenkel festzuziehen. Du solltest dies allmählich tun und darauf achten, die Schnürsenkel gleichmäßig auf beiden Seiten zu ziehen. Wenn du die Schnürsenkel ziehst, wirst du sehen, wie das Korsett Form annimmt. Wenn du die Schnürsenkel so fest wie möglich gezogen hast, binde sie unten zu einer Schleife zusammen.
Now that your corset is laced, it’s time to tie it up. Start by wrapping the laces around your waist, making sure to keep the laces even on both sides. Once you’ve wrapped the laces around your waist, tie them in a bow at the top.```
```Jetzt, da dein Korsett geschnürt ist, ist es Zeit, es zu binden. Beginne damit, die Schnürsenkel um deine Taille zu wickeln und achte darauf, dass die Schnürsenkel auf beiden Seiten gleichmäßig sind. Sobald du die Schnürsenkel um deine Taille gewickelt hast, binde sie oben zu einer Schleife.
Schließlich müssen Sie die Schnürsenkel anpassen, um die perfekte Passform zu erhalten. Lockern Sie zunächst die Schnürsenkel oben und ziehen Sie sie dann allmählich fest, bis das Korsett eng an Ihrem Körper anliegt. Wenn Sie die perfekte Passform gefunden haben, binden Sie die Schnürsenkel unten zu einer Schleife.
Und da haben Sie es! Jetzt wissen Sie, wie Sie ein Korsett alleine schnüren und binden können. Mit ein wenig Übung werden Sie in der Lage sein, das perfekte Korsett für jedes Outfit zu kreieren.
I absolutely love this, thank you! This is my first corset. Fits a little tight, but training it is. I will be buying more. Also, it is worth the wait, yall!!!
...thanks a lot again...
I was delighted with my new corsets. It turned out even better than I expected. I couldn’t be happier with my purchase.
I got this for a goth event coming up. It fits great and the shipping time was also great! Will definitely order from here again.
Satin corset with long frill with leather bows. Draculaura cosplay corset. Pinup, photoshot, sexy, prom, Valentine, wedding dress
I so in love with the corset! It fits perfectly though I did think I asked for two inches added to the back panel but maybe it was added I just can’t tell. But I’ve been showing it off.
The color is gorgeous, soft lambskin feels great, size fits decently for my frist measured corset! Very excited to where out.
I adore the two I purchased.
I think this corset it great! And very sexy. It amplifies my hips and gives me more of an hour-glass shape. And the quality is excellent!
This is the second corset I've bought from Corsettery. The sizing was different than the first one and I had to return it. But they were really great about making an exchange. And now the corset fits great. It really accentuates my shape! This is a high-quality item, and I'm going to buy more in the future.
This was my first time using Corsettery & was a little apprehensive. But between countless emails & questions answered about sizing, style, materials etc they gave me confidence that my corset would be all I could ask for. When it arrived it was indeed incredible. I cannot recommend Corsettery highly enough.
The set of 2 overbust corsets: black and white, you save 25%. Steelbone custom made corset, gothic, steampunk, bespoke, victorian
Got this for my daughter and she loves it. It is great quality and durable.
good quality and fits very nice.
I have to admitt I was Very skeptical Going into this.. I'm happy to say that it was better than what I expected as far as quality. Only negative is can't find a direct email to contact question on next purchase. But I still highly recommend. Mine is mesh underbust


As someone who wears corsets both for fashion styling and waist support, I absolutely loved this post. I wear overbust corsets when dressing up for events, but I also wear a cotton underbust corset daily under my outfits for posture and waist training. I had no idea that using the wrong lacing method could actually reduce the effectiveness of a corset or damage it over time.
This post helped me switch to a proper lacing method that not only looks neater but also preserves the shape of my corset longer. Especially for tight-lacing, even tension and secure loops are everything. It’s amazing how much better my corsets fit now, just because I learned the right way to lace them. Corsettery’s commitment to education makes them stand out so much in the corset community.
I wish I had seen this when I first started with corsets! I completely messed up my first satin corset by lacing it too tight at the top and not tightening from the waistline. I thought the discomfort was normal — turns out, I just didn’t know how to lace a corset properly. This article explains everything in such a beginner-friendly way.
I tried the bunny ear method you recommended, and the difference is incredible. Now I can wear my underbust corset from Corsettery for hours without feeling like I’m being squished in all the wrong places. The visuals and breakdowns of each technique really helped me understand what’s best for different corset styles.
Thank you for making waist training less intimidating!
Corsettery never disappoints when it comes to educating their audience. This article helped me finally understand the subtle differences between straight lacing, spiral lacing, and inverted bunny ears. I always thought lacing was just aesthetic, but now I realize how critical it is to get the right lacing technique for comfort, safety, and proper waist training.
I own several Corsettery corsets — leather, velvet, and mesh — and each one responds slightly differently to lacing. This guide gave me the confidence to adjust each one appropriately depending on the material and how tight I want to lace for the day. Honestly, it’s this kind of support and information that keeps me loyal to Corsettery. It’s more than just buying a corset — it’s learning how to wear it the right way.
This is by far one of the best guides I’ve read about how to properly lace a corset! I’ve owned corsets before, but no one ever explained the importance of lacing technique the way this post does. I recently purchased a real steel-boned underbust corset from Corsettery for waist training, and this guide completely changed the way I wear it. After switching to the bunny ears lacing method, I noticed how much more evenly the pressure distributes — no more sore ribs or uneven compression.
I also appreciate the advice on loosening the corset properly before taking it off. That’s such an overlooked tip but crucial for protecting the integrity of the fabric and boning. This blog post isn’t just educational — it’s a must-read for anyone serious about tight-lacing or wearing corsets long-term.
I’ve been tight-lacing for several years, and one thing I always tell people is this: the lacing technique matters as much as the corset itself. This guide covers that so well. Whether you’re into gothic, burlesque, or daily waist training, proper lacing will protect your corset and your body. Corsettery is one of the few brands that makes real double-steel boned corsets that can handle actual training, and this guide proves they really know what they’re doing.